Window
The first item on the title bar is the Neatware icon.
The second item is the video name. The last items are minimum, maximum,
and exit buttons. You can drag and drop the window on any place of the desktop with the left button of mouse pointing at ANYWHERE of the window's client area or title bar.
You can click the minimize button on the titlebar to show window as an icon on the taskbar.
You can click the maximize button on the titlebar to zoom the window.
If there are frame edges around the window, you can drag these edges to
enlarge or shrink the window size.
Following picture shows a video window with titlebar, frames, and statusbar.
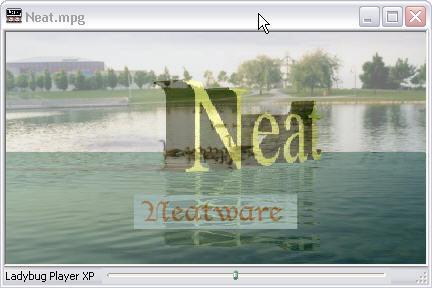
In the bottom there is the status bar. The first item
prompts messages of operation. The second item is the progress
control bar. You can drag the tag and move it to your desired
position. The next item is the dispaly of percentage. The last item
is the resize icon to enlarge/shrink the window.
NBar
Nbar is a VCR-like handheld controller. 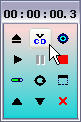 The title of NBar displays
current position of a video with time format hh:mm:ss.t. Where hh
is hour, mm is minute, ss is second, and t is tenth of second. The title of NBar displays
current position of a video with time format hh:mm:ss.t. Where hh
is hour, mm is minute, ss is second, and t is tenth of second.
You can hide the NBar by double clicking the left button in the
client window of a video. To double click left button again you can show the
NBar. You can move NBar to anywehre by dragging its title bar.
On the first row, the first button launches an open dialog box, then you can
select one or a group of video files. After close the open dialog box the video will
start to play automatically; the VCD button will launch VCD videos if there is a
vcd disk in a CD-ROM drive; the third button launches a control.
The second row includes play, pause, and stop buttons.
In addition, the first button of the third row will hide or show the status
bar. The next button sets group loop. The last button makes windowless
display. You can click the right button to make windowless mode enable.
Finally, on the last row, the first two buttons of the fourth row are volume
control. The last one is exit button.
Control
Video control is organized as a Property Sheet. There are
Playlist, Media, and Transform pages. This control is extensible:
more control pages may be added later. The cancel and close buttons
on the bottom right corner will cancel or accept the new settings.
Playlist
The list box on the top is the title list. The list
box in the middle is the name list. There are three buttons on the
bottom: new, delete, and add. You can click new button to create a
title which has an initial name "default". You may rename "default"
and selecte it with mouse. 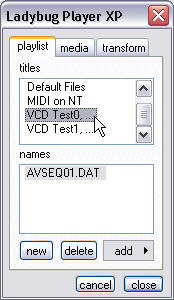 The selected
title has the blue background. The selected
title has the blue background.
You can remove any selected title with delete button.
The add button has three menu items: file, vcd, and
url. Following picture shows the file dialog after clicking the
file item.
[Figure Open File]
There are several ways to choose files: (i)
you can select one file by clicking the left button of mouse.
(ii) you can select multiple files by press Ctrl key
down and pick up files with the left button of mouse. (iii)
you can select multiple files by press Shift key down and
move the Down Arrow key.
The uplevel button is used to move current folder up to parent
folder. You can also click the arrow button in the "Look in"
combobox to change a folder. After selecting your files, press the
open button, the file addition is finished; press cancel button,
the selection is cancelled.
When you choose vcd item, Ladybug PlayerXPwill try to
find a VCD disk and add VCD video files to the title. If there is
no VCD disk inside or the files are damaged, Ladybug PlayerXP
will report an error message.
Url selection lets you find a video file on the Internet with the URL such
as http://www.neatware.com/neatware.mpg.
Media
Media control sets the properties of media playback.
They are grouped as setting, audio, and status. In the setting
group, you can select items: no loop, single loop, and group loop
from loop combo box. The [no loop] setting will not play a media in
loop, [single loop] will play a single media in loop, and the
[group loop] will play a group of media files in loop.
The rate edit box accepts rate value from 0.0 to
100.0. The value 1.0 represents the normal speed, 30 frames per
second.  The value 0.03333333
(1.0/30.0) is 1 frame per second. And the value 2.0 represents
double normal speed as 60 frames per second. It is possible for you
to play an AVI video that has been sampled as one frame per second
in normal speed. The value 0.03333333
(1.0/30.0) is 1 frame per second. And the value 2.0 represents
double normal speed as 60 frames per second. It is possible for you
to play an AVI video that has been sampled as one frame per second
in normal speed.
You can check the org box to display video in orginal
size. In the case of multiple video playback, this setting may
change window size when player starts next video file. In the audio
group, you can move volume and balance bar to adjust the volume and
balance respectively.
Finally, in the status group, checking the mute box will enable
the sound. The windowless check box will show/hide the boarder and
title bar of the video window.
The info drop-down list shows the properties of a
media. The width and height values are video's width and height.
Avetime is the average time of frames. Start time, stop time, and
current time are video's start, stop, and current position
respectively in the unit of second. Length is the duration of the
media in the unit of second. Bit rate and bit error rate represent
the properties of bit stream.
Transform
You can apply a transform on a video frame together with an image
or a 3D frame as inputs.
The list box with a scroll bar displays all available transforms.
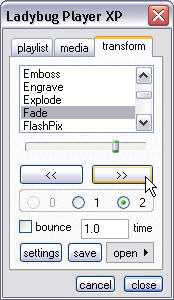 The progress bar
displays current position of a transform animation. You can drag
and move the tag of the progress bar to watch current transform
effect. The backward and forward button show the animation of
transform in backward and forward. You can set the bounce check to
show the animation in bounce. And you can press the SPACE key to
stop the animation. The progress bar
displays current position of a transform animation. You can drag
and move the tag of the progress bar to watch current transform
effect. The backward and forward button show the animation of
transform in backward and forward. You can set the bounce check to
show the animation in bounce. And you can press the SPACE key to
stop the animation.
The three radio box show the required inputs of a transform. The
time edit box lets you input the duration of a transform. It will
display a default value when you choose a transform.
Settings button displays a property page of a transform which
includes some configurations. Save button saves current transformed
picture into a .bmp file. Open menu button will display four items:
image A, image B, mesh A, mesh B. They let you select an input for
image A or B or mesh A or B.
Note: NT 4.0 will not support 3D meshes.
Keyboard
Keyboard provides another method to control video
playback.
|

