|
Customize
You can launch Ladybug Player XP along with a configure file.
For example, you can launch Ladybug Player with your High-Definition video in fullscreen
to demo- nstrate your business products.
There are two methods to set the configuration: by Ladybug Run XP or by
Command Line.
I. Use Ladybug Run XP
Ladybug Run XP allows you launch Ladybug Player XP with customized configuration.
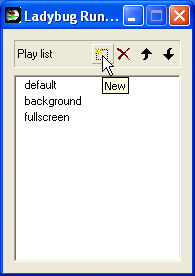
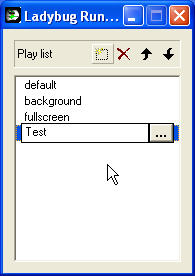
- Launch Ladybug Run XP.
- Add a new item by clicking the New button on the top.
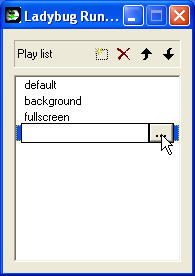
- Click dot ... button on the right to initialize.
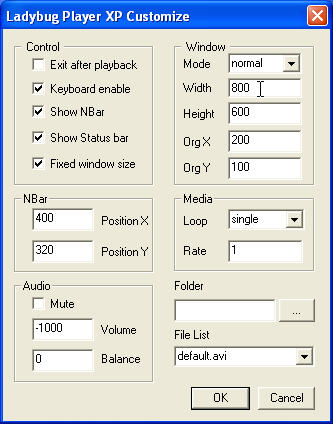
You can select a video file from the Folder button and set other parameters.
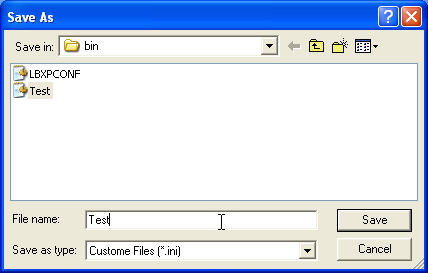
- Click OK to save settings to a .inf file.
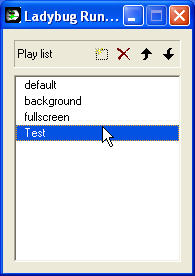
- Click the white space then the item is highlighted.
- Double click the selected item to play a video.
- Click the right mouse button on the highlighted item to modify the settings.
- Click Delet, Up, or Down buttons for necessary operations.
II. Use Command Line
You can also launch Ladybug PlayerXP in Run or command line:
LBXPFULL path\foo.mpg
It launches video foo.mpg in the path directory.
LBXPFULL path\foo.mpg /c .\LBXPCONF.ini
It launches video foo.mpg in the path directory.
The /c is a tag that specifies the next parameter
is a customize file. The customize file is LBXPCONF.ini
which is located in the bin directory. You must declare
the . (current directory or a full path) to use the customize
file, otherwise Player will find the default customize file.
III. Customized File
Customized file has the extension .ini. It stores the
control parameters for Ladybug PlayerXP
in starting. The control parameters are divided into sections with
the format [section_name]. Each section includes a series of key=value items.
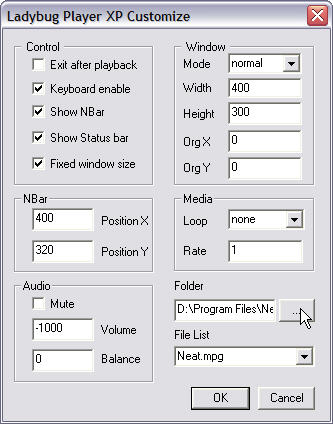
The default setting is
[control]
autoexit=false; keyboard=enable; nbar=enable; statusbar=show; fixed=true
[nbar]
orgx=200; orgy=200
[window]
mode=normal; width=640; height=480; orgx=200; orgy=100
[media]
loop=none; rate=1.0
[audio]
volume=-1000; balance=0; mute=false
Sections
[control]
autoexit=false|true
when it is true the player will terminate automatically after
a video playback. The false will leave player in the
interactive control.
keyboard=enable|disable
it will enable keyboard access if the value is enable.
The ESC will terminate the video playback. F1 is for help.
F2, F3, F4 are for play, pause, and stop. F5 and F6 is for
volume down and up. F7, F8 is for rate down and up. F9 sets
the loop.
nbar=enable|disable
it will show the nbar if the value is enable, otherwise it
will disable the nbar.
statusbar=show|hide
it will show the statusbar if the value is show, otherwise
it will hide the statusbar.
fixed=true|false
this is the control of the window for a group of video playback.
The value true will set all the window with the fixed size.
[nbar]
orgx=INTEGER
it defines the x position of the nbar. (unimplemented)
orgy=INTEGER
it defines the y position of the nbar. (unimplemented)
[window]
mode=normal|windowless|fullscreen
it specifies the mode of the starting window. The normal value
shows a normal window with titlebar and statusbar. The windowless
value specifies a window without regular window frames. The fullscreen
shows the video in fullscreen.
width=INTEGER
height=INTEGER
width and height specify the width and height of the window.
orgx=INTEGER
orgy=INTEGER
orgx and orgy specify the orgin position of the window.
[media]
loop=none|single|group
it controls the loop of one or a group of videos. The value none
has no loop. The single will play an individual video in loop.
The group will play a group of videos in loop.
rate=DOUBLE
it controls the rate of a video playback. The 1.0 represents normal
speed. 0.5 represents half speed. 2.0 represents double speed.
[audio]
volume=LONG
it controls the volume of an audio. It has a signed long integer value.
The default value is -1000.
balance=LONG
it controls the balance of an audio. 0 is the middle value.
mute=true|false
true value will mute the audio.
IV. Examples
|